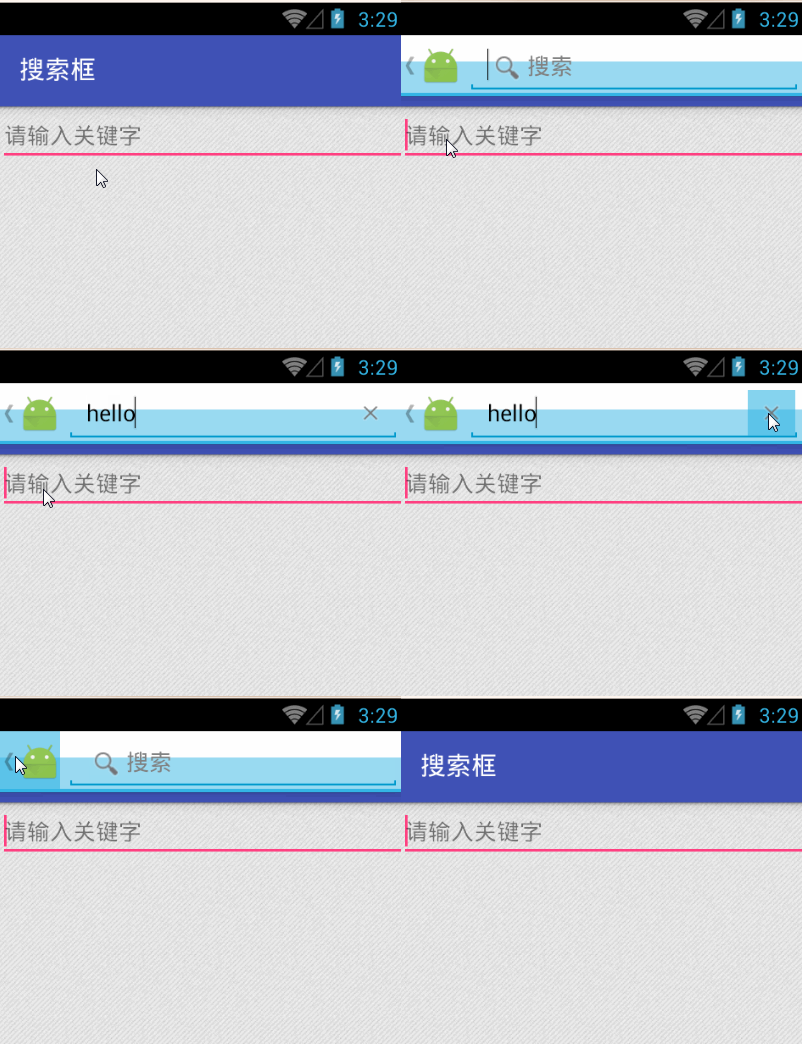
Android 给搜索提供了统一接口:search dialog 和 search widget。本文只讲 search dialog——它只能出现在 Activity 窗口上方。下面以点击 EditText 启动搜索框为例。
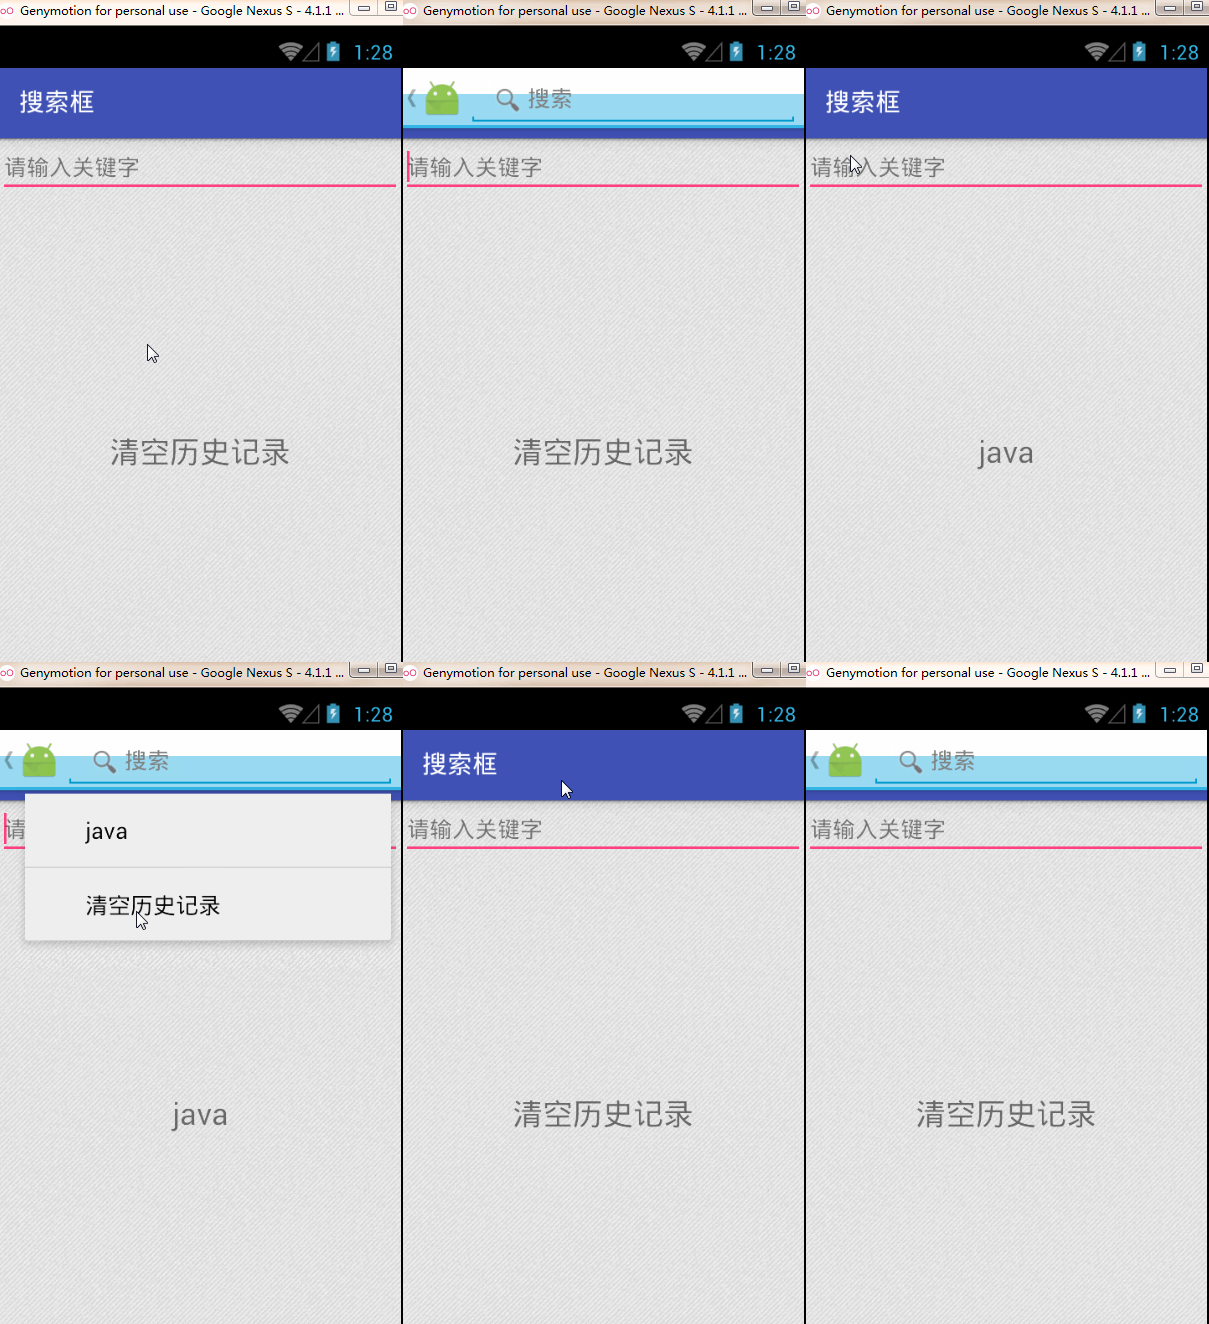
效果如下:
一、searchable.xml
新建 searchable.xml,放在 res/xml,配置搜索框属性:
<?xml version="1.0" encoding="utf-8"?>
<searchable xmlns:android="http://schemas.android.com/apk/res/android"
    android:label="@string/app_name"
    android:hint="@string/search_hint"/>
-
android:label 是唯一必须项,指向应用名。实际上只有在 Quick Search Box 的 search suggestions 可用时才看得见
-
android:hint 不是必须,但建议总是写上,是输入前的提示语
其它属性见官方文档:
<?xml version="1.0" encoding="utf-8"?>
<searchable xmlns:android="http://schemas.android.com/apk/res/android"
    android:label="string resource"
    android:hint="string resource"
    android:searchMode=["queryRewriteFromData" | "queryRewriteFromText"]
    android:searchButtonText="string resource"
    android:inputType="inputType"
    android:imeOptions="imeOptions"
    android:searchSuggestAuthority="string"
    android:searchSuggestPath="string"
    android:searchSuggestSelection="string"
    android:searchSuggestIntentAction="string"
    android:searchSuggestIntentData="string"
    android:searchSuggestThreshold="int"
    android:includeInGlobalSearch=["true" | "false"]
    android:searchSettingsDescription="string resource"
    android:queryAfterZeroResults=["true" | "false"]
    android:voiceSearchMode=["showVoiceSearchButton" | "launchWebSearch" | "launchRecognizer"]
    android:voiceLanguageModel=["free-form" | "web_search"]
    android:voicePromptText="string resource"
    android:voiceLanguage="string"
    android:voiceMaxResults="int"
    >
    <actionkey
        android:keycode="KEYCODE"
        android:queryActionMsg="string"
        android:suggestActionMsg="string"
        android:suggestActionMsgColumn="string" >
</searchable>
二、Manifest 声明 Searchable Activity
搜索结果 Activity 可以是当前页,也可以单独一个。这里直接用当前 SearchActivity:
<application
    android:allowBackup="true"
    android:icon="@mipmap/ic_launcher"
    android:label="@string/app_name"
    android:supportsRtl="true"
    android:theme="@style/AppTheme">
    <meta-data
        android:name="android.app.default_searchable"
        android:value=".SearchActivity"/>

    <activity android:name=".SearchActivity">
        <intent-filter>
            <action android:name="android.intent.action.MAIN" />
            <category android:name="android.intent.category.LAUNCHER" />
        </intent-filter>
        <intent-filter>
            <action android:name="android.intent.action.SEARCH" />
        </intent-filter>

        <meta-data
            android:name="android.app.searchable"
            android:resource="@xml/searchable" />
    </activity>
</application>
activity 内 meta-data 的 android:name 必须是 android.app.searchable,android:resource 指向 res/xml/searchable.xml。
三、启动 search dialog
Activity 里调 onSearchRequested():
@Override
public void onClick(View v) {
    switch (v.getId()){
        case R.id.search_edit:
            onSearchRequested();
            break;
    }
}
搜索前要做别的事,重写 onSearchRequested:
@Override
public boolean onSearchRequested() {
    //这个方法中干你想干的事
    doSometingOther();
    return super.onSearchRequested();
}
需要带参数时:
public boolean onSearchRequested() {
    Log.i(TAG,"onSearchRequested------------========");
    Bundle appData = new Bundle();
    appData.putString("key", "your info");
    startSearch(null, true, appData, false);
    return true;
}
四、取出搜索关键字
关键字:String query = intent.getStringExtra(SearchManager.QUERY);。取之前先判断 action 是否为 android.intent.action.SEARCH:
Intent intent = getIntent();
if (Intent.ACTION_SEARCH.equals(intent.getAction())) {
    String query = intent.getStringExtra(SearchManager.QUERY);
}
五、结果在当前页处理:singleTop + onNewIntent
结果可以单独一个类,也可以在当前搜索框所在类处理。若在当前类处理,要设 singleTop,避免再创建 Activity。这时 onCreate 不会再走;若只在 onResume 里 getIntent(),拿到的还是旧 Intent,action 不是 SEARCH——搜索后 Intent 已经变了,Activity 里缓存的还是原来那个。正确做法:重写 onNewIntent,setIntent(intent) 更新后再处理。原文 handleIntent 误用了 getIntent() 而不是参数 intent,这里按参数修正:
@Override
protected void onCreate(Bundle savedInstanceState) {
    super.onCreate(savedInstanceState);
    setContentView(R.layout.activity_search_dialog_layout);
    mSearchEdit = (EditText) findViewById(R.id.search_edit);
    mContentTxt = (TextView) findViewById(R.id.search_content_txt);
    mSearchEdit.setOnClickListener(this);
    handleIntent(getIntent());
}

/** 重复刷新当前 Activity 时执行 */
@Override
protected void onNewIntent(Intent intent) {
    setIntent(intent);
    handleIntent(intent);
}

private void handleIntent(Intent intent) {
    if (Intent.ACTION_SEARCH.equals(intent.getAction())) {
        String query = intent.getStringExtra(SearchManager.QUERY);
        doMySearch(query);
    }
}

/** 处理搜索结果 */
public void doMySearch(String query){
    mContentTxt.setText(query);
}
六、记录搜索历史
查完希望留下关键字,用 SearchRecentSuggestionsProvider。先建 Provider:
public class SearchSuggestionProvider extends SearchRecentSuggestionsProvider {

    final static String AUTHORITY = "com.debby.googlemap.SuggestionProvider";
    final static int MODE = DATABASE_MODE_QUERIES;

    public SearchSuggestionProvider() {
        super();
        setupSuggestions(AUTHORITY, MODE);
    }
}
Manifest 里 authorities 必须和 Provider 一致:
<provider android:name="com.debby.googlemap.SearchSuggestionProvider"
    android:authorities="com.debby.googlemap.SuggestionProvider" />
Activity 里保存:
SearchRecentSuggestions suggestions = new SearchRecentSuggestions(this,
        SearchSuggestionProvider.AUTHORITY, SearchSuggestionProvider.MODE);
suggestions.saveRecentQuery(query, null);
下次搜索就能看到历史。
七、清空历史
重写 Provider 的 query,在 Cursor 末尾加一条「清空历史记录」:
@Override
public Cursor query(Uri uri, String[] projection, String selection, String[] selectionArgs, String sortOrder, CancellationSignal cancellationSignal) {
    String[] items = null;
    Cursor cursor = super.query(uri, projection, selection, selectionArgs, sortOrder);
    int arrayLength = cursor.getCount();
    if (arrayLength != 0) {
        items = new String[arrayLength + 1];
        cursor.moveToFirst();
        int i = 0;
        for (cursor.moveToFirst(); !cursor.isAfterLast(); cursor.moveToNext()) {
            int number = cursor.getColumnIndex("suggest_intent_query");
            items[i] = cursor.getString(number);
            i++;
        }
        items[i] = "清空历史记录";
    } else {
        return null;
    }

    String[] columns = new String[]{"suggest_format", "suggest_text_1", "suggest_intent_query", "_id"};
    MatrixCursor stringCursor = new MatrixCursor(columns);
    String row[] = new String[4];
    int i = 0;
    for (CharSequence item : items) {
        row[0] = "" + 0;
        row[1] = item.toString();
        row[2] = item.toString();
        row[3] = "" + (++i);
        stringCursor.addRow(row);
    }
    return stringCursor;
}
| 步骤 |
关键点 |
| searchable.xml |
label 必填,hint 建议填 |
| Manifest |
SEARCH action + android.app.searchable 指向 xml |
| 启动 |
onSearchRequested / startSearch 可带 Bundle |
| 取关键字 |
ACTION_SEARCH + SearchManager.QUERY |
| 当前页出结果 |
singleTop + onNewIntent + setIntent |
| 历史 |
SearchRecentSuggestionsProvider 保存/清空 |
一句话总结:search dialog 靠 searchable.xml + Manifest;当前页出结果必须 singleTop 并在 onNewIntent 里换 Intent。