Fragment栈
周sir |
2015年8月18日 |
Fragment碎片 |
0 条评论 | 1898
Activity 有任务栈,Fragment 也有回退栈。把 Fragment addToBackStack 之后点返回,就能回到上一个 Fragment。下面对照 APIDemo 的 FragmentStack。
一、效果与布局
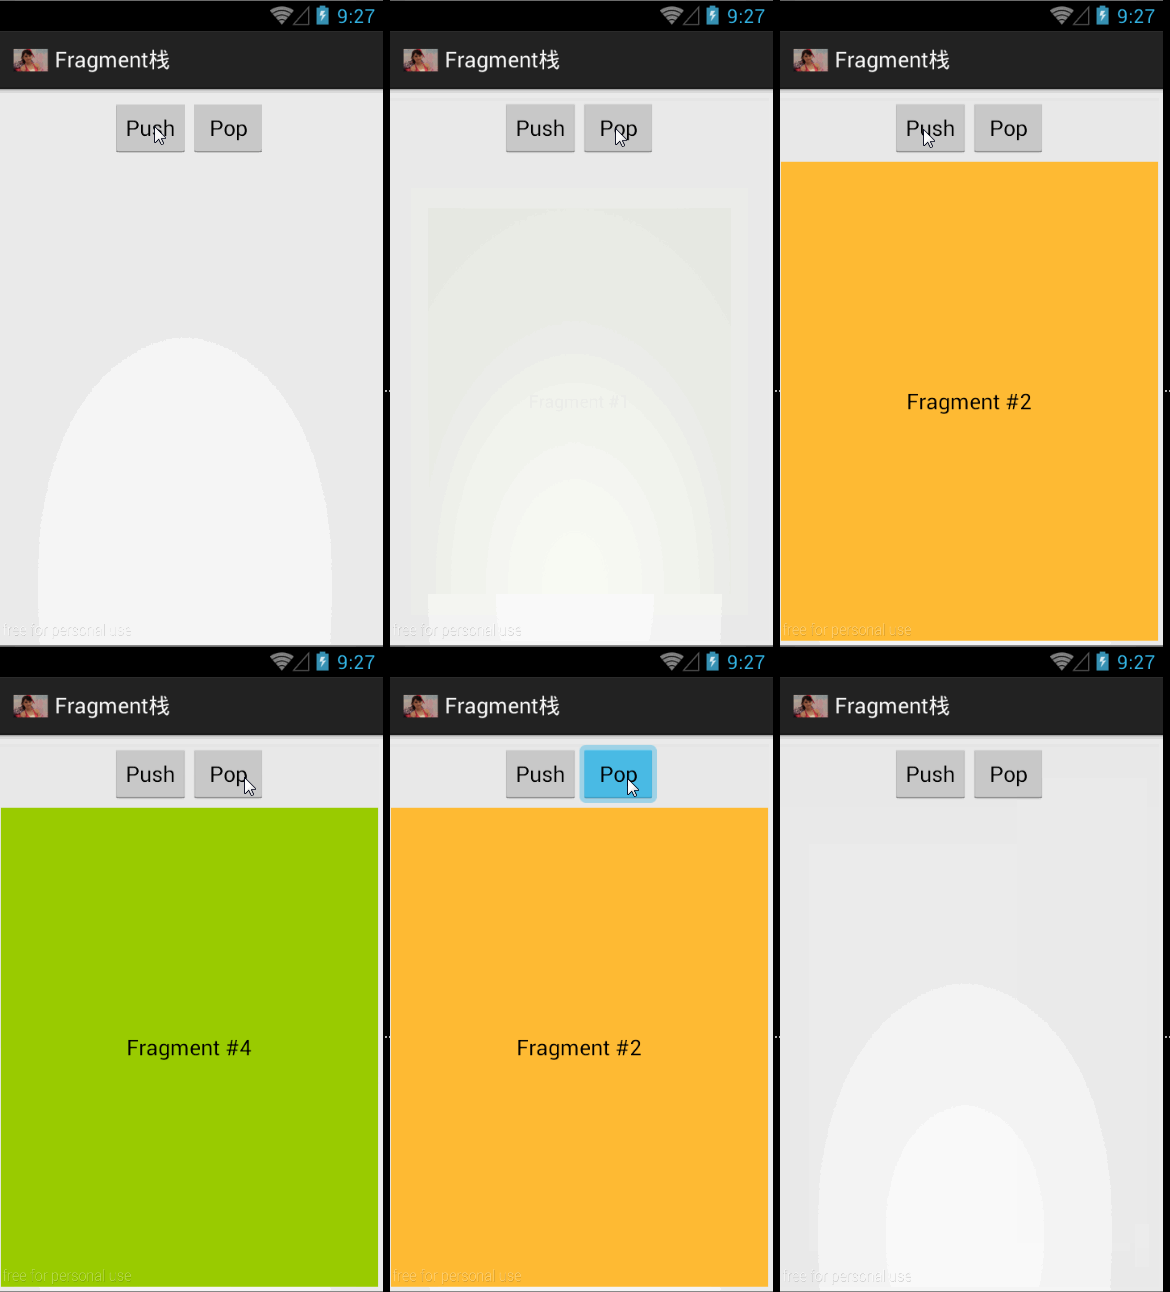
Push 压栈、Pop 弹栈,中间 FrameLayout 承载当前 Fragment:
布局 fragment_stack.xml:
<LinearLayout xmlns:android="http://schemas.android.com/apk/res/android"
    android:layout_width="match_parent"
    android:layout_height="match_parent"
    android:gravity="center_horizontal"
    android:orientation="vertical"
    android:padding="4dip" >
    <LinearLayout
        android:layout_width="wrap_content"
        android:layout_height="wrap_content"
        android:layout_weight="0"
        android:gravity="center_horizontal"
        android:measureWithLargestChild="true"
        android:orientation="horizontal"
        android:padding="4dip" >
        <Button
            android:id="@+id/new_fragment"
            android:layout_width="wrap_content"
            android:layout_height="wrap_content"
            android:text="Push" >
            <requestFocus />
        </Button>
        <Button
            android:id="@+id/delete_fragment"
            android:layout_width="wrap_content"
            android:layout_height="wrap_content"
            android:layout_weight="0"
            android:text="Pop" />
    </LinearLayout>
    <FrameLayout
        android:id="@+id/simple_fragment"
        android:layout_width="match_parent"
        android:layout_height="0px"
        android:layout_weight="1" />
</LinearLayout>
二、压栈与弹栈
Push:mStackLevel++ 后 replace + addToBackStack(null)。Pop:mStackLevel-- 再 popBackStack()。CountingFragment 用 arguments 传入序号,背景色按 mNum % 3 轮换蓝绿橙(数组里还有红色未用到)。
public class FragmentStack extends Activity {
    int mStackLevel = 0;

    @Override
    protected void onCreate(Bundle savedInstanceState) {
        super.onCreate(savedInstanceState);
        setContentView(R.layout.fragment_stack);
        Button button = (Button) findViewById(R.id.new_fragment);
        button.setOnClickListener(new OnClickListener() {
            public void onClick(View v) {
                mStackLevel++;
                addFragmentToStack();
            }
        });
        button = (Button) findViewById(R.id.delete_fragment);
        button.setOnClickListener(new OnClickListener() {
            public void onClick(View v) {
                mStackLevel--;
                getFragmentManager().popBackStack();
            }
        });
    }

    void addFragmentToStack() {
        Fragment newFragment = CountingFragment.newInstance(mStackLevel);
        FragmentTransaction ft = getFragmentManager().beginTransaction();
        ft.replace(R.id.simple_fragment, newFragment);
        ft.setTransition(FragmentTransaction.TRANSIT_FRAGMENT_OPEN);
        ft.addToBackStack(null);
        ft.commit();
    }

    public static class CountingFragment extends Fragment {
        int mNum;
        private static int[] sColorValue = new int[] {
                android.R.color.holo_blue_light,
                android.R.color.holo_green_light,
                android.R.color.holo_orange_light,
                android.R.color.holo_red_light };

        static CountingFragment newInstance(int num) {
            CountingFragment f = new CountingFragment();
            Bundle args = new Bundle();
            args.putInt("num", num);
            f.setArguments(args);
            return f;
        }

        @Override
        public void onCreate(Bundle savedInstanceState) {
            super.onCreate(savedInstanceState);
            mNum = getArguments() != null ? getArguments().getInt("num") : 1;
        }

        @Override
        public View onCreateView(LayoutInflater inflater, ViewGroup container,
                Bundle savedInstanceState) {
            View v = inflater.inflate(R.layout.fragment_stack_layout, container, false);
            View tv = v.findViewById(R.id.text);
            ((TextView) tv).setText("Fragment #" + mNum);
            tv.setBackgroundDrawable(getResources().getDrawable(android.R.drawable.gallery_thumb));
            Log.v("TAG", "mNum % 3 " + mNum % 3);
            tv.setBackgroundColor(getActivity().getResources().getColor(sColorValue[mNum % 3]));
            return v;
        }
    }
}
| 操作 |
代码 |
| 压栈 |
replace 后 ft.addToBackStack(null) |
| 弹栈 |
getFragmentManager().popBackStack() |
FragmentTransaction ft = getFragmentManager().beginTransaction();
ft.addToBackStack(null);

getFragmentManager().popBackStack();
一句话总结:replace 之后必须 addToBackStack,返回键 / popBackStack 才能回到上一个 Fragment。
转载请注明来源:Fragment栈

我是周sir,这是我的博客。致力于分享我学会的技术和优秀的文章。微信公众号 “周sir专栏” 欢迎大家关注。